Notes on Using Git
This note explains how to work with git. It is based on the Git book.[1]
Turning a Folder into Git
Go to the folder and run:
1 | git init |
Then add some files:
1 | git add *.txt |
Add some stuff to .gitignore:
1 | *~ |
Now you can do the usual ‘git commit -a’ to stage and commit modified files. Git add of course adds files to the staging area. List all tracked files with:
1 | git ls-tree -r master --name-only |
Using Git to Correct Mistakes
Since git is version control and not backup, using a remote directory is not necessary. If a file is commited, it can be reversed to that state.
Viewing What Went Wrong
Running ‘git log’ will list previous commits, ‘git log --stat’ gives stats of insertions and deletes. List the diff of the last two commits with:
1 | git log -p -2 |
View branches and merges in the last two weeks that inserted or modified a certain stringwith:
1 | git log --pretty=format:"%h %s" --graph --since=2.weeks -Sfunction_name |
Undoing Things
One of the few times you can lose data in Git is when you want to undo an undo. Be aware!
Soft Cases
If you committed but want to change the commit message or add a file you forgot, use:
1 | git commit --amend |
If you staged a file and want to unstage it, use:
1 | git reset HEAD <file> |
These commands are soft because they only touch your staging area, not your working directory. Now let’s look at hard cases that changes you actual files.
Hard Cases
One of the most common cases will be to revert changes made to a file back to the last committed version. Do that with:
1 | git checkout -- <file> |
Notice that this is a hard change — any changes you make to that file is gone becuase Git just copied the committed file in its place. If you want to keep other versions but undo them for now, you have to get into stashing and branching. As a general rule, anything you ever committed is safe for ever. Uncommitted modifications are the dangerous ones.
Adding a remote repository
Tracking and Fetching
Add a remote directory with
1 | git remote add [shortname] [url] |
Now you can use ‘git fetch’ to get the changes from that directory. ‘git pull’ fetches and merges the changes. Be careful with that command!
You can show configured information about remote repositories that you are tracking with:
1 | ± git remote show origin |
Remote tracking are not local copies of those files, but markers of activity on remote repositories. To integrate those changes, you have to ‘fetch’ and ‘merge’, or ‘pull’. A tracking directory is a local directory that has a direct relation to a remote directory — for example after a ‘git clone’ — so you can ‘git push’ and ‘git pull’ without any additional arguments. With a tracked branch you can also use ‘git fetch --all; git branch -vv’ to update the information and see if your local or remote branch is “ahead” or “behind” with commits. Other tracking branches can be created or added to existing branches with:
1 | git checkout --track origin/serverfix |
If you have forked a repository on github and then cloned your fork, you are missing out on any edits made to the original project that you forked. If you want to include there (which is not always the case) you need to start tracking that repository as well, for example:
1 | git remote add upstream https://github.com/octocat/Spoon-Knife.git |
Then you can merge those changes to your local master branch (or for a more safe option — you local dev branch) and then push them to your fork repository.
Bare Repositories
To add a central repository that has no working tree and consists of a folder that solely contain its Git repository, use:
1 | git init --bare repo.git |
This is not necessary though, and you can use Git distributed by only having “normal” Git repositories. When working with a team of several people, having a bare repository is an easy way of organizing a master directory that all members or the public can clone. A Github repository is a bare repository, for example. Another option is to create a bare repository locally and then scp that repository to a server:
1 | // Make a local bare clone of your repository |
Pushing
You can ‘git push’ to the bare directory if you have write access. Write access is handled by normal file permissions. A common method for a remote repository is to make a ‘git’ non-interactive user on the system and put users public ssh keys in ‘~/.ssh/authorized_keys’ of that user. Pushing can also be done to local repositories, for example you can have a bare repository in your dropbox folder.
If you don’t use keys but don’t want to run the password every time you can cache it with:
1 | git config --global credential.helper cache. |
If you try to push and someone else have pushed to the bare repository, Git will not accept the push. Instead, you have to fetch and then integrate the changes and then push again.
Setting up a Git user on a Git server
Add a git user, append ssh keys, make project folder and initiate bare repository.
1 | sudo adduser git |
Now a user can do set up their own git repository and push its commit to the bare repository. Other users can then clone this repository and start pushing and pulling.
1 | cd myproject |
For more complicated servers with anonymous access you can setup Apache with Smart HTTP and more github-like functions like issue trackers you can setup GitLab.
Branches
Branching is a key feature in Git that can be used extensively in everyday Git usage — not just when forking projects. A good practice can even be to never have something half-finished on your master branch. Always branch when working on a file, test it, and then merge back to the master. This way you can work on a blogpost on one branch at the same time you work on a theme change on another branch and then merge the post and push even though you are not finished with the theme change. If the theme change were not on its own branch, the push would break the site.
A new branch is created (but not switched to) by ‘git branch’. You switch with ‘git checkout [-b to create at the same time]’. Git knows which branch you are on because ‘HEAD’ points to it. Switching branches changes which files and file states that are in your working directory, but it is always possible to switch back (unless a branch is deleted.). However, if you checkout a new branch and commit some changes, then checkout the previous branch and commit some other changes, the two branches have diverted. At that point you either go in a different direction, or you merge.
New files and changes only belong to a new branch when you commit them to that branch. To “claim” a file, you need to commit with a certain branch.
1 | git chekcout -b new |
A history of branching as merging can be seen with:
1 | git log --oneline --decorate --graph --all |
Merging
You have created and switched to a branch [‘git checkout -b hotfix’]. You have worked on that branch. Now you want to merge it back to the master branch.
1 | git checkout master |
This creates a fast-forward merge. The reason is that you had not worked on the master branch in the meantime. Git could just merge the branched by “following” the hotfix branch and put the head of the master at the edge of that branch. The last command deletes the branch that is not identical to master and not needed anymore.
If you have worked on the master branch in the meantime, git has to do some work to merge the branches. In most cases there is no conflict and git can merge the two at the point of their common ancestor. This is the case when you have modified different files in the different branches (which is a good practice), or even different parts of the same file. The resulting snapshot is a three-way merge commit between the two branch tips and their common ancestor.
Merge Conflicts
A merge conflict will occur if the same content of the same file has been edited. Git will pause the merge and ask you to solve the conflict. The output of ‘git status’ will show the unmerged paths and what is the problem with them. Git add conflict markers to the content of the files where it finds a problem. This can be annoying if you forget them in there, but some perl magic can get rid of them. A merge conflict can look like this:
1 | <<<<<<< HEAD:index.html |
Everything above ‘=======’ is from the file the branch you have checked out (your ‘HEAD’); everything below is in the file of the branch being merged. Now you have to manually solve the conflict. Choose one of them and delete the other (together with the extra markers) or re-write the whole section to accommodate a little bit of both. After you resolved the conflict, you can run ‘git add’ on each file to mark it as resovled. Then you can run ‘git commit’ to finish the merge.
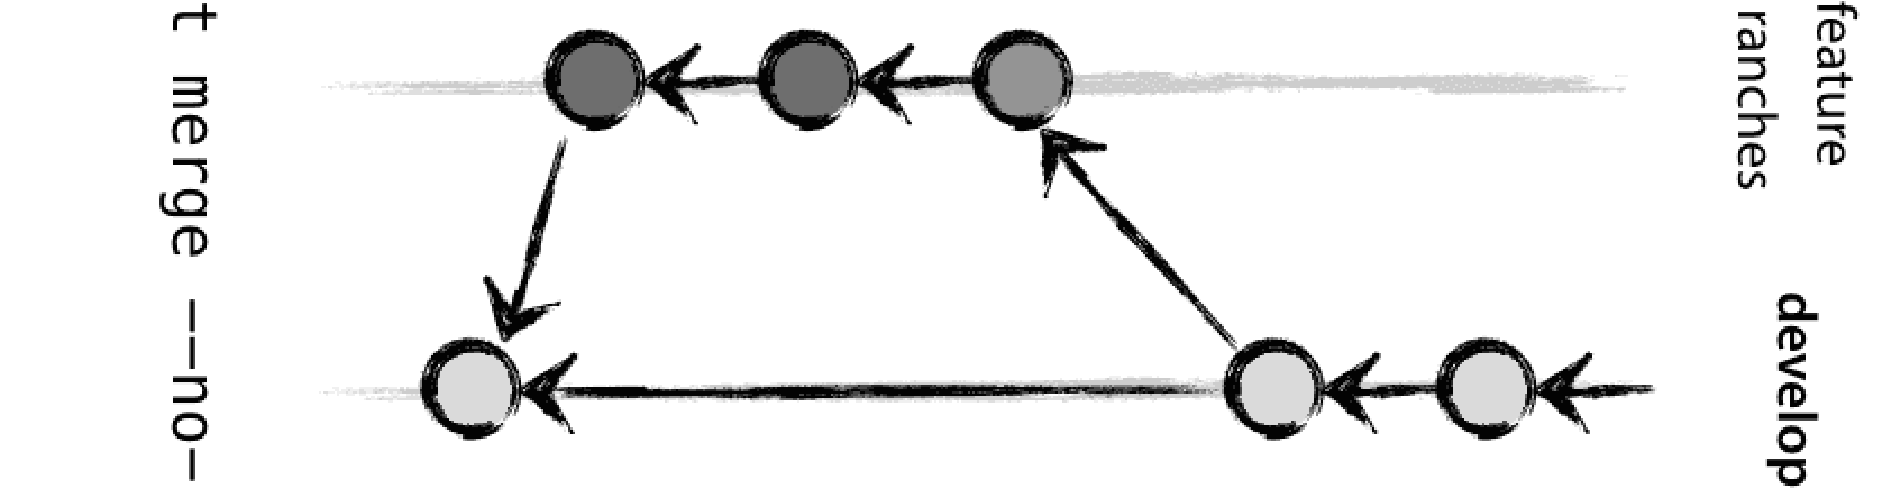
A code file can break even though there are no merge conflict. A file has function F1(). Branch_A add F2() that calls function_1(). Branch_B edits F1() and changes its structure. A merge can occur seamlessly but the file breaks. A solution to this is to use a bleeding edge branch — for example called ‘development’ — that is always ahead of the master branch that only contains stable code. Issues open their own shorter-lived topic branches but are then merged into ‘development’ where their compatibility is tested before their are merged back into ‘master’. This is called “progressive-stability branching”.
Extras
Remove a file with ‘git rm’ to remove it from the disk and stage its removal. Similarly, ‘git mv’ renames files.
A few aliases can be handy:
1 | git config --global alias.unstage 'reset HEAD --' |
Github and Dropbox
Dropbox records all small changes so checking in and out of branches will look like file adding, deleting and modifying for dropbox. Dropbox can be a problem if you edit from multiple locations at the same time and conflict files are generated which can be messy to fix.